Can I turn any photo into a cross stitch pattern for free?
Yes, you can turn any photo into a cross stitch chart for free. The page makes one square per stitch, gives each color its own symbol, and lists every color in a key with its stitch count. Pick Fewer, Medium or More colors, set your fabric, then save the chart as a PDF or print it. There is no watermark, and your photo stays on your device.
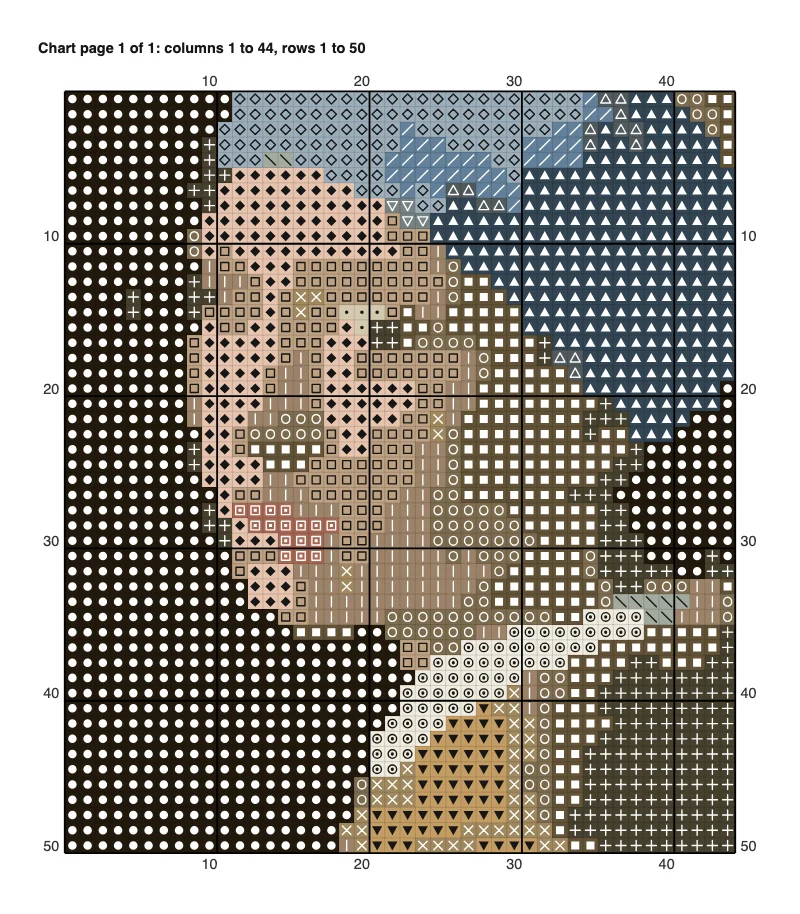
Yes. Press “Choose a photo” and the chart appears on the page, with its size in stitches and in inches for your Aida fabric. This image to cross stitch pattern maker needs no sign-up and nothing to install, so you can save the PDF and start stitching.
How to turn an image into a cross stitch pattern
Choose a photo
Press “Choose a photo” and select any picture stored on your phone, tablet or computer. The chart appears right away.
Set colors, fabric and size
Pick Fewer, Medium or More colors. Open “More settings” for the Aida count, the pattern size and the paper, then read the line that gives your finished size.
Check the symbols
Press “Show the symbols” to see the chart the way it prints. The key under the picture lists each color with its symbol and its number of stitches.
Save or print the pattern
Press “Save as a PDF” for the overview and chart pages, “Print the pattern” for paper copies, or “Save as a PNG” for one picture holding the chart and the key.
Pick a photo that stitches well
Start with a picture that has one clear subject and a plain background. A pet in front of a wall, a single flower, a house seen head-on or a portrait lit by daylight all turn into readable charts. Look for strong contrast between the subject and what sits behind it, because every square holds just one color and soft edges can blur together in a small chart. Crowded scenes, tiny faces in a group shot and photos taken in dim light carry more detail than a few hundred stitches can hold. When you have several shots of the same subject, load the sharpest and brightest first.
Decide where the piece will go before choosing the size
Think about the finished piece first. A bookmark, an ornament or a card insert suits Small, with 60 stitches along the longest side. A framed piece for a shelf suits Medium at 100, and a wall piece suits Large at 150. Then set the Aida count. A higher count packs more squares into each inch, so the same chart stitches up smaller and finer, while 11 count gives larger squares that are kinder to tired eyes. Read the size line after every change. Hold your hoop or frame against the inches or centimeters shown, and leave extra fabric on every side for hooping and framing.
Compare two color settings
Try Medium first, then Fewer and More, and look at each with “Show the symbols” off and on. Fewer means fewer skeins to buy and fewer thread changes, which helps on photos with flat areas such as a painted door or a clear sky. More keeps the gradual shading in faces, fur and skin tones. Save a PNG of each version and look at them side by side on your phone. Choose the one where the subject is still easy to recognize from arm’s length, since that is how the finished piece will usually be seen.
Read the key before you buy thread
Open the color key and look at the stitch counts. Colors with a large share of the stitches need the most thread, so match those first, and hold each thread beside its color block in daylight to compare, rather than under a lamp. A color used for only a handful of stitches deserves a second look: ask whether the shade matters to the picture or whether a thread from your own box would do the job. Write the symbol next to each thread on a small card, or tape a short length of each thread beside its symbol, so the chart and the skeins stay matched while you work.
Print the pages and mark your place
Print the pattern and clip the pages in the order shown on the overview page. The overview tells you which page holds which part of the picture, so you always know where you are. Find the middle of your fabric by folding it in half one way and then the other, and match that point to the middle of the chart by counting in from the edge numbers. Count stitches using the darker line after every 10th stitch and row instead of counting one by one. Cross off finished rows with a pencil or a highlighter, and keep the pages flat in a folder so the symbols stay clean.
Make a chart as a gift
Choose a photo the receiver already loves: a pet, a house, a favorite place or a child at a birthday table. Make the chart before you buy fabric and thread. Look at the symbol view and the size line, and ask whether the face or the main shape still reads clearly at that size. If not, try a different photo of the same subject, one taken closer or in better light. When the chart looks right, save the PDF, print the pages and gather the threads listed in the key. A finished piece in a frame shows something familiar, stitched by hand.
Stitch a first project in stages
A first chart is easier when the picture is small. Pick Small and Fewer colors, stitch it on 14 count Aida, and learn how the chart pages, the symbols and the darker 10-stitch lines work together. Once that piece is done, you will know how long a page of stitches takes you and how many colors you enjoy working with. Use those two numbers to choose the size and the color setting for the next photo, and keep the PNG of the first chart as a record of what you made.
FAQ
How can I convert a photo to cross stitch?
Choose the photo on this page and the chart appears at once, one square per stitch. Pick Fewer, Medium or More colors, set your Aida count under “More settings”, then save the PDF or print the pages. No account and no app are needed.
Can I make a cross stitch pattern from a picture for free?
Yes, this page is free and works in your browser, on any phone, tablet or computer. Nothing is installed, no sign-up is asked for, and the PDF, the printed pages and the PNG carry no watermark. Your photo is read on your device and never uploaded.
I am new to cross stitch. What is the easiest way to make my first chart?
Press “Choose a photo” and leave the settings alone. The page starts with Medium colors (up to 20), 14 count Aida and a Medium pattern of 100 stitches along the longest side. A photo shaped 4 to 3 then gives 100 by 75 stitches, 7.1 by 5.4 inches.
How many colors should a pattern have?
Start with Medium, which allows up to 20 colors. Fewer allows up to 10 for a simpler chart, and More allows up to 30 to keep finer shading. The finished chart can use fewer colors than the limit when two colors are hard to tell apart.
What size pattern should I make?
Choose by the finished piece you want. Small is 60 stitches along the longest side, Medium is 100 and Large is 150. The Aida count changes the size too, and the line on the page shows the result in inches and centimeters before you save.
Why are there lots of single stitches dotted around my chart?
Single stitches stand out when a color has no neighbor of its own kind. The page already changes such a stitch to the most common color around it. If the chart still looks busy, try Fewer colors or a photo with a plainer background.
What does the PDF contain?
The first page shows the whole pattern, when the chart takes more than one page, the page number of each part and the color key with hex code, stitch count and share of all stitches. Chart pages follow, with a symbol on every stitch, a darker line after every 10th stitch and row, and numbers along the edges.
Is there an app that turns pictures into cross stitch charts?
No app is needed. The chart is made in your browser, whatever device you use. Choose the photo, adjust the colors and size, and save the PDF or PNG straight from the page.
Updated
Related tools
- 10x10 gridPrint a blank 10x10 grid with 100 squares in three sizes. Add numbers 1 to 100, then print the sheet or save it as a clear PNG.
 4 Quadrant Graph PaperPrint free 4 quadrant graph paper with bold x and y axes, numbered both ways from 0. Pick square size and paper, then save as PDF, PNG or JPG.
- 8x8 gridPrint a free 8x8 grid of 64 squares in your browser. Pick Small, Medium or Large squares, add letters and numbers, then print or save a PNG.
 Add grid to photoAdd a grid to any photo in your browser, with no sign-up and no watermark. Get a numbered grid or a plain grid overlay, then save it or print it at true size.
- Ar TracingInstead of ar tracing with a phone stand, put a numbered grid on your own photo, then save or print it and copy it square by square. Free, no sign-up.
 Aspect Ratio CalculatorUse this aspect ratio calculator to turn a width and height into a ratio like 16:9. You also get the decimal and a resize that keeps the shape.
- Atmospheric PerspectiveAdd a numbered grid to a photo and compare near and far squares to see atmospheric perspective: lighter values, softer color. Free, in your browser.
- Bargue DrawingPractice Bargue drawing from your own photo: add a numbered grid with 5, 8 or 12 squares across, then save it or print a gridded sheet and an empty one.