How do I get a printable perspective grid for 1, 2 or 3 point drawing?
Horizon line
More settings
Get a printable perspective grid by choosing 1 point, 2 point or 3 point and a High, Middle or Low horizon. Then press the print button. Lines run to each vanishing point, which is marked with a dot, and the horizon is drawn as a dark line. The sheet prints sideways on Letter or A4, or you can save the grid as a picture to lay over a drawing.
Bigger PNG or clear background, with Pro
A perspective grid is a sheet of guide lines that meet at one, two or three vanishing points on a horizon. Pick the number of points and the horizon height here, and the sheet is ready to print. It starts on 2 point with a Middle horizon.
How to print a perspective grid
Pick the number of points
Choose 1 point, 2 point or 3 point. The lines run to each marked vanishing dot, and the sheet starts on 2 point with a Middle horizon until you change it.
Set the horizon
Choose a High, Middle or Low horizon. The dark horizon line moves up or down on the sheet, and the lines and dots follow it.
Print the sheet
Press “Print perspective grid”. The sheet prints sideways on Letter or A4, chosen from your browser’s region. Draw on the printed lines with a pencil.
Or save a PNG
Press “Save as a PNG” to get a picture up to 1500 pixels wide, on a white background. Pro saves it at 2K or 4K, or with a clear background to lay over a drawing in a drawing app.
Who draws on a blank perspective sheet
Print a sheet before you start any drawing that needs boxes to sit convincingly in space. Architecture students use one for the first sketch of a room or a street. Comic artists block in the layout of a panel before inking. Product designers rough out a shape as a box and carve it down. Art teachers hand out sheets so a whole class works from the same horizon and the same dots.
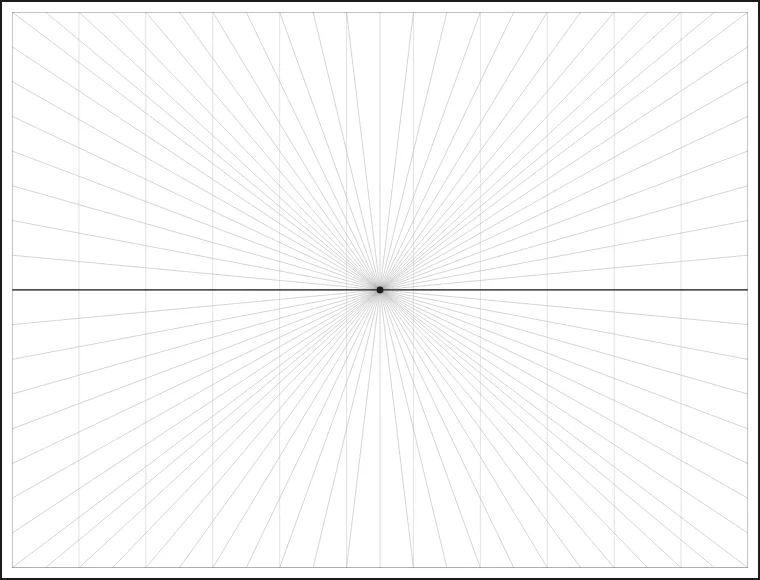
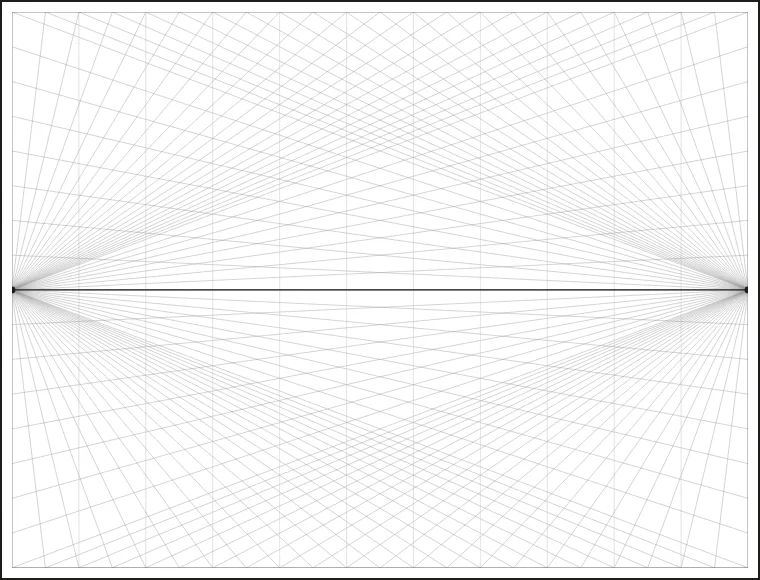
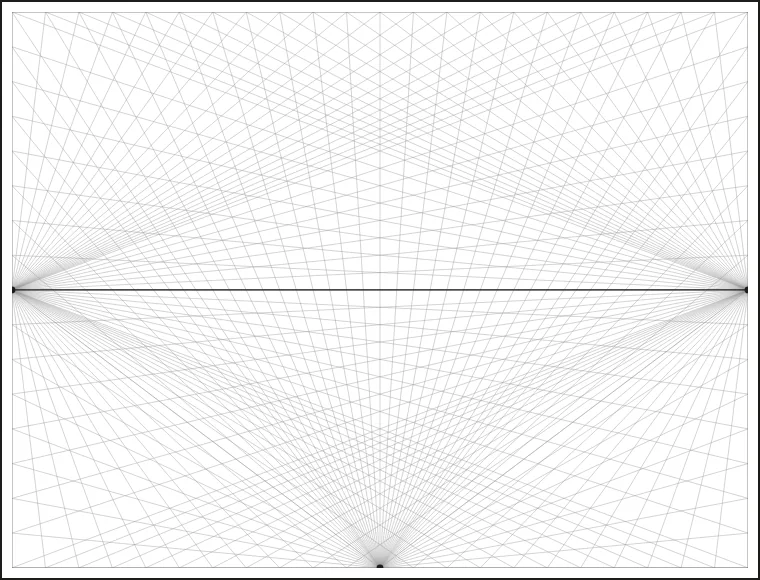
1 point, Middle horizon. 2 point, Middle horizon. 3 point, Middle horizon.
Pick the system from the view you want
Stand where the viewer stands, then ask which faces point straight at you.
1 point perspective
Choose 1 point when a wall, a floor or a road runs straight away from you. A corridor, a railway track and the inside of a shelf all fit. Front faces stay flat and square, and only the edges that run into the distance head for the dot.
Two points
Choose 2 point when you see a building or a box from its corner. Neither visible face is square to you, so both slant toward their own dot. Most street scenes and exterior views belong here.
Three points
Choose 3 point when you look steeply up at a tall tower or down from a roof. The upright edges lean together as well, which gives the sense of height or drop. On this sheet the third dot sits at the bottom middle, so it suits a view looking down. With a Low horizon the third dot moves to the top middle, so it suits a view looking up.
Set the horizon where your eyes are
The horizon line is eye level, so decide where your eyes are before you pick High, Middle or Low. A High horizon suits a view from a balcony or a stair, where you see the tops of tables and the layout of a floor. A Middle horizon suits a person standing in a room. A Low horizon suits a view from the ground or from a seat, where buildings and figures tower overhead. Everything above the horizon is seen from below, and everything under it is seen from above.
A two point example: a street corner
Print a 2 point sheet with a Middle horizon. Draw one tall upright line for the nearest corner of a building, with the horizon crossing it about halfway up. Run light lines from its top and bottom to the left dot and to the right dot. These four lines give you the roof edge and the ground edge of both walls.
Cut each wall off with an upright line wherever you like, and the corner building is done. For the next house, run new lines from the same dots. Because every house shares the same two dots, the whole street agrees. Change the horizon to Low and draw the same corner again, and you will see the building rise above you.
Draw the first box
On a 2 point sheet, start with one upright line for the nearest corner of a box. Place it between the dots and not close to either. Run light lines from its top and bottom toward each dot.
Mark where you want the box to end along those lines and draw two more upright lines. Then join their tops and bottoms back toward the opposite dots to close the shape. Check that every receding edge points at a dot. Upright edges on 1 point and 2 point sheets should stay parallel to the upright lines already printed.
Keep objects away from the edges
On a 2 point sheet, boxes drawn near a dot stretch and look wrong. Keep your main subject in the middle stretch of the sheet, well away from the dots, and the angles stay believable. On a 1 point sheet the dot sits in the center, so objects near it look fine and stretch more toward the edges. If a scene needs a wide view, draw the large shapes in the center and let smaller details sit to the sides.
Common perspective mistakes
Most problems come from a few habits. Look for these first when a drawing feels wrong.
A receding edge that misses its dot
Lay a ruler along the edge and check where it points. One stray edge is enough to make a box look twisted.
A leaning upright edge
On a 1 point or 2 point sheet, upright edges stay parallel to the printed upright lines. Do not let them tilt.
Two horizons in one drawing
Pick one eye level and draw every object from it. A box drawn from a higher view than its neighbor looks like it floats.
A subject crowded near a dot
Boxes drawn close to a dot stretch. Move the subject toward the middle of the sheet.
Reaching for 3 point too soon
The third dot adds a steep tilt. Use it only for a strong view up or down, and stay on 2 point for most scenes.
A learning path
Work in small steps, one system at a time. Start on a 1 point sheet and draw a single cube, then a hallway. Move to a 2 point sheet and draw one box, then a row of boxes of different sizes. Repeat the same box on a High, a Middle and a Low horizon. When those feel easy, try a 3 point sheet with a Low horizon and draw a tall tower seen from below.
Short, repeated exercises teach more than one long drawing.
A short history
Perspective drawing grew out of Renaissance Italy. Historians record that Filippo Brunelleschi carried out a series of perspective experiments between 1415 and 1420. Leon Battista Alberti then wrote De pictura around 1435, a treatise on how to show distance in painting. Today the same idea is taught as 1, 2 and 3 point perspective, which is what this sheet prints.
Keep the construction light
Draw guide lines with a hard, sharp pencil and little pressure so they can be erased or ignored. When the structure is correct, lay a second sheet of thin paper on top and trace only the edges that belong to the final drawing. The printed lines show through, and the finished page stays clean. Too many lines on a sheet make the drawing hard to read, so draw only the lines you need to place each edge.
Use the PNG as a layer
Open the saved picture in a drawing app and put it on its own layer. The free PNG has a white background, so set that layer's blend mode to Multiply and the white stops hiding what is beneath. The clear PNG that comes with Pro has no background, so it needs no blend mode. Lower the layer’s opacity if the lines compete with your strokes, lock its position so it stays put, and draw on a separate layer. When the drawing is done, hide the layer and the construction disappears.
Print a small stack
Print one sheet for each system you use, and a few extra of the one you practice most. Label each sheet with the date and the horizon you chose. Short exercises work well on them: a single cube, a stack of three cubes, a row of steps, a doorway in a wall. Repeat the same exercise on a High, a Middle and a Low horizon. Compare the sheets side by side to see how eye level changes the same shape.
Use the sheets in a lesson
Give each student a 1 point, a 2 point and a 3 point sheet. Ask them to trace the horizon in one color and the lines to each dot in another, so the structure is clear at a glance. Then set one object, such as a book or a box, and have everyone draw it three times, once on each sheet. The class can hold the sheets up together and see how the same object changes with the number of points.
Check the drawing against the sheet
When a drawing looks off, lay a ruler along each receding edge and see whether it points at a dot. A single edge that misses its dot is usually the cause. Then check that the upright edges are parallel on 1 point and 2 point sheets. Fixing those two things solves most problems before any shading starts.
FAQ
Which perspective system should I use?
Use 1 point when one face of the scene is square to you, such as a hallway or a road running straight ahead. Use 2 point for a building seen from its corner, and 3 point when you look steeply up or down a tall subject. The sheet starts on 2 point.
What is the difference between 1 point and 2 point perspective?
1 point has a single vanishing dot in the middle of the horizon, so front faces stay flat and square to you. 2 point has a dot at each end of the horizon, so both visible faces of a box slant away. Upright lines stay vertical on both sheets.
What does the horizon setting change?
The horizon setting places the dark horizon line High, Middle or Low on the sheet. A high horizon leaves more room for what lies below eye level, and a low horizon leaves more room for what rises above it. With 3 point, a Low horizon moves the third dot to the top middle.
Can I print the perspective grid to work on paper?
Yes. Press “Print perspective grid” and the sheet prints sideways on Letter or A4, picked from your browser’s region. Pencil straight onto the printed lines, or lay thin paper on top and trace the lines you need.
Can I save the sheet from this perspective grid maker as a picture?
Yes. “Save as a PNG” saves the sheet as a white picture up to 1500 pixels wide. Put it on a layer under your sketch in a drawing app, and the lines guide your strokes. Pro also saves a PNG with a clear background, up to 4096 pixels wide, to lay over your sketch.
Is it really free with no signup?
Yes. The grid is free, adds no watermark, needs no sign-up and has nothing to install. Open the page in your browser, choose your points and horizon, and print or save the sheet.
Does this perspective grid generator work on iPad?
Yes. Phones, tablets and computers can all run this page right in the browser. Open it on your tablet, choose the points and horizon, then print the sheet or save the PNG to use in a drawing app.
Updated
Related tools
- Printable grid paperGet printable grid paper with Small, Medium or Large squares. Print a sheet on Letter or A4 paper, free, with no sign-up.
- Square gridMake a square grid online by choosing columns and rows. Pick the square size, add numbers, then print the sheet or save it as a PNG.
 Rule of thirds gridAdd a rule of thirds grid to any photo in your browser. Choose a photo and the 3 by 3 lines appear, ready to save or print.
- 10x10 gridPrint a blank 10x10 grid with 100 squares in three sizes. Add numbers 1 to 100, then print the sheet or save it as a clear PNG.
 4 Quadrant Graph PaperPrint free 4 quadrant graph paper with bold x and y axes, numbered both ways from 0. Pick square size and paper, then save as PDF, PNG or JPG.
- 8x8 gridPrint a free 8x8 grid of 64 squares in your browser. Pick Small, Medium or Large squares, add letters and numbers, then print or save a PNG.
 Add grid to photoAdd a grid to any photo in your browser, with no sign-up and no watermark. Get a numbered grid or a plain grid overlay, then save it or print it at true size.
- Ar TracingInstead of ar tracing with a phone stand, put a numbered grid on your own photo, then save or print it and copy it square by square. Free, no sign-up.